How to create Custom boot screen in xp using Tuneup
Posted by Symon Pum on Sunday, August 7, 2011
Under: PC tips
Tuneup Utility
គឺជាកម្មវិធីមួយដែលមានសម្ថភាពច្រើនយ៉ាងណាស់ដូចជា ការបោសសំអាត Files
ឥតប្រយោជន៍ក្នុង HDD, កែប្រែ Interface Window, ជួសជុល និង រៀបចំ Files
ក្នុង HDD និង Registry , កែប្រើដំណើរការ បិទ និងបើកកុំព្យូទ័រ
និងមុខផ្សេងៗជាច្រើនទៀត ។ ហើយក្នុងនោះដែរ ការកែ Boot Screen
ក៏ជាមុខងារមួយដែល Tuneup អាចធ្វើបានផងដែរ ។
ហេតុនេះ ក្នុង Post មួយនេះ ខ្ញុំបានលើកមកបង្ហាញមិត្តទាំងអស់ពីរបៀបដាក់ Boot Screen សំរាប់ Window XP តាមរយៈការប្រើកម្មវិធី Tuneup Utility នេះ ។
ហេតុនេះ ក្នុង Post មួយនេះ ខ្ញុំបានលើកមកបង្ហាញមិត្តទាំងអស់ពីរបៀបដាក់ Boot Screen សំរាប់ Window XP តាមរយៈការប្រើកម្មវិធី Tuneup Utility នេះ ។

- ដំបូងអ្នកត្រូវ តំឡើងកម្មវិធី Tuneup Utility លើកុំព្យូទ័រអ្នកជាមុនសិន (ស៊េរីណាក៏បាន )
(First, you need to install Tuneup Utility on your PC (all versions) ) - ដំនើរការកម្មវិធី Tuneup Utility 2008 (ករណីខ្ញុំប្រើប្រាស់ )
- ជ្រើសរើស Customize Window
Change Boot Screen នោះអ្នកនឹងឃើញដូចរូបខាងក្រោម ៖
- បន្ទាប់មកចុច New Screen នោះវានឹងចេញផ្ទាំងថ្មីមួយមកទៀត
- ត្រង់ចំនុចទី១ Select Image
- ត្រង់ចំនុចទី២ Customize Image Appearance អ្នកអាចកែដូចខាងក្រោម ៖
(Next, on Customize Image Appearance you should change as below )
- Alignment : Scale (recommended)
- Border : Everywhere (recommended)
- Background: Black ( you can change as you want) - ត្រង់ចំនុចទី៣ Customize Process bar អ្នកអាចកែប្រែតាមចំនូលចិត្ត
( Next , on Customize Process bar you can edit as you want )
- Position : (up to you)
- Foreground: (up to you)
- Frame : (up to you) - ចំនុចទី ៤ គឺ Finish
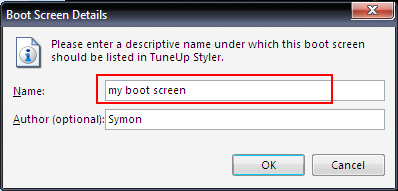
អ្នកចុច Save boot screen
- ចុងក្រោយ អ្នកគ្រាន់តែចុចលើ Boot Screen ដែលអ្នកបានបង្កើត
(Run Tuneup Utility 2008 which I’ve install on my PC)

( Select Customize Window tab on the left and then choose Chang Boot Screen under Tuneup Styler you’ll see as image below: )

( Then, Click on New Screen a new Create Boot Screen Window will appear)

( As shown on picture above, go to Select Image
( On Finish you just click on Save boot screen then name it as your wish
(The last step is: just select on your created Boot screen

Enjoy…!!!
In : PC tips